مقدمه
Virtual Routing and Forwarding (VRF) تکنولوژیای است که امکان ایجاد چندین جدول مسیریابی مجزا و مستقل در یک روتر فیزیکی را فراهم میکند. هر VRF دارای مجموعه اختصاصی از interface ها، route ها و پروتکلهای routing است.
مفهوم VRF
VRF به شما این امکان را میدهد که:
چندین شبکه مجزا روی یک روتر فیزیکی داشته باشید
از IP های یکسان (overlapping) در VRF های مختلف استفاده کنید
ایزولهسازی کامل ترافیک بین tenant های مختلف داشته باشید
امنیت و حریم خصوصی بهتری برای مشتریان مختلف فراهم کنید
کاربردها
در محیطهای Service Provider:
ارائه سرویس VPN به مشتریان مختلف
جداسازی ترافیک tenant های مختلف
استفاده بهینه از زیرساخت مشترک
در شبکههای Enterprise:
جداسازی ترافیک بین دپارتمانها
اتصال به ISP های مختلف با جداول routing جداگانه
محیطهای test/production جداگانه
مقایسه با VLAN
همانطور که VLAN broadcast domain های جداگانه ایجاد میکند، VRF هم جداول routing مجزا ایجاد میکند:
ویژگی |
VLAN |
VRF |
|---|---|---|
لایه |
Layer 2 |
Layer 3 |
جداسازی |
Broadcast Domain |
Routing Table |
پشتیبانی Overlapping IP |
خیر |
بله |
سناریوی نمونه
در تمام سناریوهای این workshop، توپولوژی زیر را در نظر میگیریم:
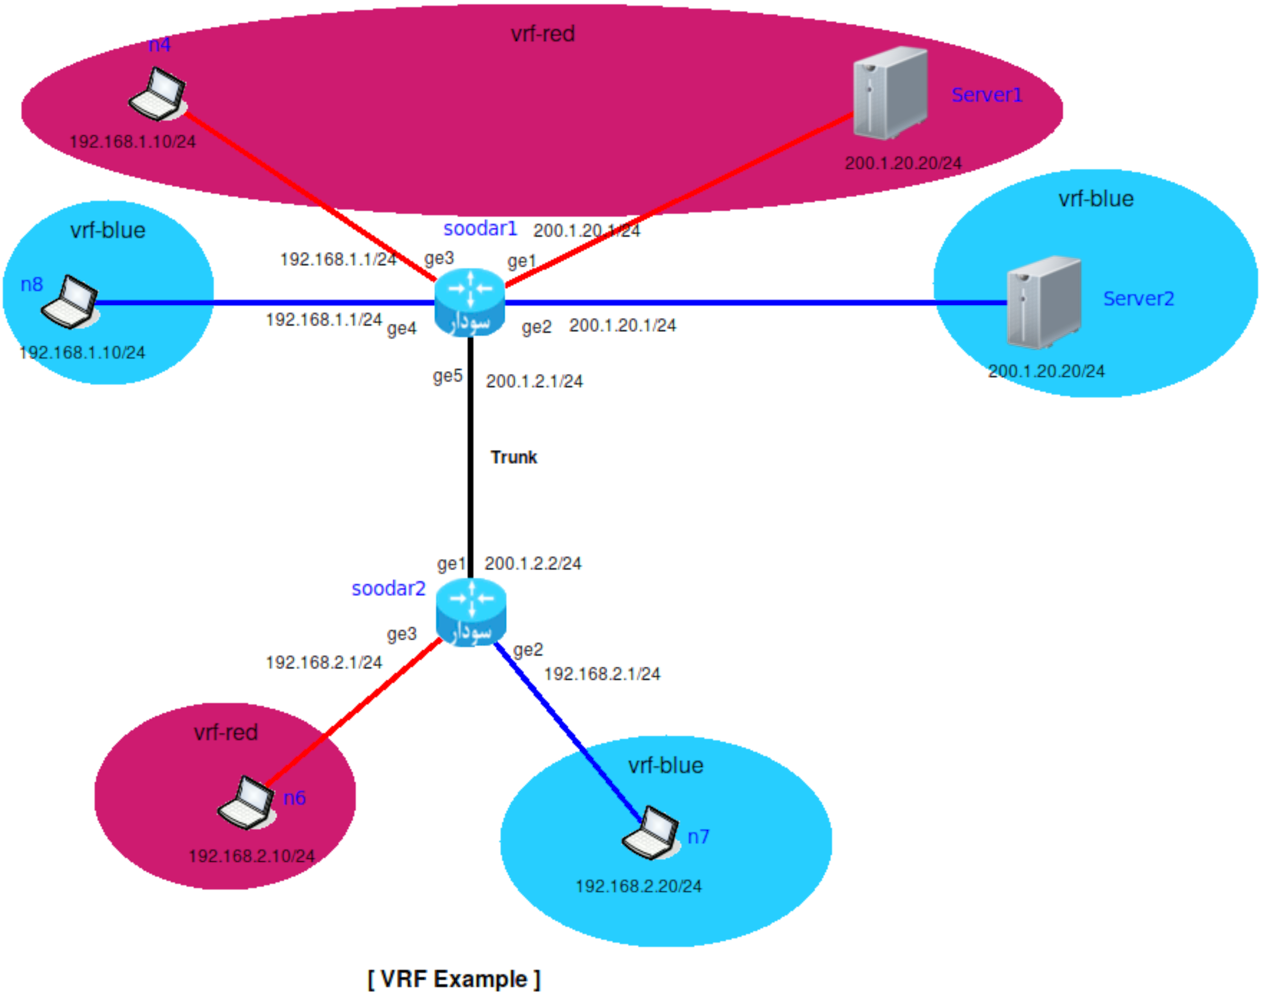
توپولوژی:
دو VRF:
vrf-redوvrf-blueIP های یکسان در VRF های مختلف
استفاده از VRF Trunking بین روترها
پروتکل routing: OSPF
سناریو 1: ایجاد VRF پایه
هدف
ایجاد دو VRF مجزا با IP های overlapping
توپولوژی
[n1] --- vrf-red --- [n3]
     \
      -- vrf-blue --- [n4]
پیکربندی
مرحله 1: ایجاد VRF
- vrf VRF-NAME
این دستور برای ایجاد یک VRF جدید استفاده میشود.
VRF-NAME: نام VRF را مشخص میکند.
ابتدا VRF ها را تعریف میکنیم:
n1(config)# vrf vrf-red
n1(config)# vrf vrf-blue
n1(config)# exit
n1#
نکته
نام VRF میتواند هر رشته الفبایی-عددی باشد. بهتر است از نامهای معنادار استفاده کنید.
مرحله 2: مشاهده VRF های ایجاد شده
- show vrf
این دستور برای نمایش لیست تمام VRF های ایجاد شده استفاده میشود.
n1# show vrf
vrf vrf-red id 1 table 100
vrf vrf-blue id 2 table 200
n1#
در این خروجی:
id: شناسه داخلی VRF
table: شماره جدول routing در kernel
سناریو 2: اختصاص Interface به VRF
هدف
نحوه قرار دادن interface ها در VRF های مختلف
پیکربندی
مرحله 1: اختصاص interface به vrf-red
- ip vrf forwarding VRF-NAME
این دستور برای اختصاص یک interface به یک VRF استفاده میشود.
VRF-NAME: نام VRF که interface باید به آن اختصاص داده شود را مشخص میکند.
n1(config)# interface ge1
n1(config-if)# ip vrf forwarding vrf-red
n1(config-if)# ip address 200.1.20.1/24
n1(config-if)# no shutdown
n1(config-if)# exit
n1(config)#
مرحله 2: اختصاص interface دیگر به vrf-red
n1(config)# interface ge3
n1(config-if)# ip vrf forwarding vrf-red
n1(config-if)# ip address 192.168.1.1/24
n1(config-if)# no shutdown
n1(config-if)# exit
n1(config)#
مرحله 3: اختصاص interface به vrf-blue با IP یکسان
n1(config)# interface ge2
n1(config-if)# ip vrf forwarding vrf-blue
n1(config-if)# ip address 200.1.20.1/24
n1(config-if)# no shutdown
n1(config-if)# exit
n1(config)#
مرحله 4: اختصاص interface دیگر به vrf-blue
n1(config)# interface ge4
n1(config-if)# ip vrf forwarding vrf-blue
n1(config-if)# ip address 192.168.1.1/24
n1(config-if)# no shutdown
n1(config-if)# exit
n1(config)# write
n1(config)# exit
n1#
نکته
دقت شود که با قرار دادن اینترفیس در vrf تمامی ip های آن حذف می شوند .
بررسی و تست
مشاهده interface های VRF
n1# show interface vrf vrf-red brief
Interface       IP-Address      Status       Protocol
ge1             200.1.20.1/24   up           up
ge3             192.168.1.1/24  up           up
n1#
n1# show interface vrf vrf-blue brief
Interface       IP-Address      Status       Protocol
ge2             200.1.20.1/24   up           up
ge4             192.168.1.1/24  up           up
n1#
توجه کنید که IP های 200.1.20.1/24 و 192.168.1.1/24 در هر دو VRF استفاده شدهاند!
سناریو 3: Routing در VRF با OSPF
هدف
پیکربندی پروتکل routing (OSPF) در VRF ها
توپولوژی
[n1] vrf-red --- ge1.100 --- ge1.100 vrf-red [n2]
     vrf-blue --- ge1.200 --- ge1.200 vrf-blue
پیکربندی
مرحله 1: OSPF برای vrf-red در n1
n1(config)# router ospf vrf vrf-red
n1(config-router)# network 200.1.20.0/24 area 0
n1(config-router)# network 192.168.1.0/24 area 0
n1(config-router)# redistribute connected
n1(config-router)# exit
n1(config)#
مرحله 2: OSPF برای vrf-blue در n1
n1(config)# router ospf vrf vrf-blue
n1(config-router)# network 200.1.20.0/24 area 0
n1(config-router)# network 192.168.1.0/24 area 0
n1(config-router)# redistribute connected
n1(config-router)# exit
n1(config)# write
n1(config)# exit
n1#
مرحله 3: OSPF برای vrf-red در n2
n2(config)# router ospf vrf vrf-red
n2(config-router)# network 200.1.20.0/24 area 0
n2(config-router)# network 192.168.2.0/24 area 0
n2(config-router)# redistribute connected
n2(config-router)# exit
n2(config)#
مرحله 4: OSPF برای vrf-blue در n2
n2(config)# router ospf vrf vrf-blue
n2(config-router)# network 200.1.20.0/24 area 0
n2(config-router)# network 192.168.2.0/24 area 0
n2(config-router)# redistribute connected
n2(config-router)# exit
n2(config)# write
n2(config)# exit
n2#
بررسی و تست
بررسی OSPF neighbor در vrf-red
n1# show ip ospf vrf vrf-red neighbor

Neighbor ID     Pri State           Dead Time Address         Interface
200.1.2.2         1 Full/DR           35.123s 200.1.2.2       ge1.100
n1#
مشاهده جدول routing برای vrf-red
n1# show ip ospf vrf vrf-red route
============ OSPF network routing table ============
N    192.168.1.0/24        [10] area: 0.0.0.0
                           directly attached to ge3
N    192.168.2.0/24        [20] area: 0.0.0.0
                           via 200.1.2.2, ge1.100
N    200.1.20.0/24         [10] area: 0.0.0.0
                           directly attached to ge1

============ OSPF router routing table =============
============ OSPF external routing table ===========

n1#
مشاهده FIB برای vrf-red
n1# show ip fib vrf vrf-red
Codes: K - kernel route, C - connected, S - static, R - RIP,
       O - OSPF, I - IS-IS, B - BGP, E - EIGRP, N - NHRP,
       T - Table, v - VNC, V - VNC-Direct, A - Babel, F - PBR,
       f - OpenFabric,
       > - selected route, * - FIB route, q - queued, r - rejected, b - backup
       t - trapped, o - offload failure

VRF vrf-red:
C>* 192.168.1.0/24 is directly connected, ge3, 00:05:23
O>* 192.168.2.0/24 [110/20] via 200.1.2.2, ge1.100, weight 1, 00:02:15
C>* 200.1.20.0/24 is directly connected, ge1, 00:05:30
n1#
بررسی routing برای vrf-blue
n1# show ip fib vrf vrf-blue
VRF vrf-blue:
C>* 192.168.1.0/24 is directly connected, ge4, 00:05:23
O>* 192.168.2.0/24 [110/20] via 200.1.2.2, ge1.200, weight 1, 00:02:10
C>* 200.1.20.0/24 is directly connected, ge2, 00:05:30
n1#
نکته
توجه کنید که هر VRF جدول routing کاملاً مجزایی دارد. route های vrf-red در vrf-blue قابل مشاهده نیستند و بالعکس.
سناریو 4: VRF Trunking (استفاده از Sub-Interface)
هدف
اتصال چندین VRF از طریق یک interface فیزیکی با استفاده از VLAN و sub-interface
مسئله
دو روتر n1 و n2 دارای دو VRF هستند (vrf-red و vrf-blue). برای ارتباط OSPF نیاز است که هر VRF interface جداگانهای داشته باشد. اما فقط یک interface فیزیکی بین دو روتر وجود دارد.
راهحل
استفاده از sub-interface ها با VLAN tagging (802.1Q)
توپولوژی
[n1] ge1 (trunk) ---- ge1 (trunk) [n2]
     |                     |
     +- ge1.100 (vrf-red)  +- ge1.100 (vrf-red)
     |  VLAN 100           |  VLAN 100
     |                     |
     +- ge1.200 (vrf-blue) +- ge1.200 (vrf-blue)
        VLAN 200              VLAN 200
پیکربندی
مرحله 1: ایجاد sub-interface برای vrf-red در n1
n1(config)# interface ge1.100
n1(config-if)# encapsulation dot1q 100
n1(config-if)# ip vrf forwarding vrf-red
n1(config-if)# ip address 200.1.2.1/24
n1(config-if)# no shutdown
n1(config-if)# exit
n1(config)#
مرحله 2: ایجاد sub-interface برای vrf-blue در n1
n1(config)# interface ge1.200
n1(config-if)# encapsulation dot1q 200
n1(config-if)# ip vrf forwarding vrf-blue
n1(config-if)# ip address 200.1.2.1/24
n1(config-if)# no shutdown
n1(config-if)# exit
n1(config)# write
n1(config)# exit
n1#
مرحله 3: ایجاد sub-interface برای vrf-red در n2
n2(config)# interface ge1.100
n2(config-if)# encapsulation dot1q 100
n2(config-if)# ip vrf forwarding vrf-red
n2(config-if)# ip address 200.1.2.2/24
n2(config-if)# no shutdown
n2(config-if)# exit
n2(config)#
مرحله 4: ایجاد sub-interface برای vrf-blue در n2
n2(config)# interface ge1.200
n2(config-if)# encapsulation dot1q 200
n2(config-if)# ip vrf forwarding vrf-blue
n2(config-if)# ip address 200.1.2.2/24
n2(config-if)# no shutdown
n2(config-if)# exit
n2(config)# write
n2(config)# exit
n2#
نکته
توجه کنید که از IP یکسان (200.1.2.x/24) در هر دو VRF استفاده شده است. این امکان فقط با VRF وجود دارد.
مرحله 5: اضافه کردن sub-interface ها به OSPF
در n1:
n1(config)# router ospf vrf vrf-red
n1(config-router)# network 200.1.2.0/24 area 0
n1(config-router)# exit
n1(config)# router ospf vrf vrf-blue
n1(config-router)# network 200.1.2.0/24 area 0
n1(config-router)# exit
n1(config)# write
در n2:
n2(config)# router ospf vrf vrf-red
n2(config-router)# network 200.1.2.0/24 area 0
n2(config-router)# exit
n2(config)# router ospf vrf vrf-blue
n2(config-router)# network 200.1.2.0/24 area 0
n2(config-router)# exit
n2(config)# write
بررسی و تست
بررسی sub-interface ها
n1# show interface ge1.100
Interface ge1.100 is up, line protocol is up
  Hardware is Ethernet, address is 52:54:00:12:34:56
  Internet address is 200.1.2.1/24
  Encapsulation 802.1Q, VLAN Id 100
  VRF Binding: vrf-red
  MTU 1500 bytes, BW 1000000 Kbit
n1#
بررسی OSPF neighbor از طریق trunk
n1# show ip ospf vrf vrf-red neighbor

Neighbor ID     Pri State           Dead Time Address         Interface
200.1.2.2         1 Full/DR           35.123s 200.1.2.2       ge1.100
n1#
n1# show ip ospf vrf vrf-blue neighbor

Neighbor ID     Pri State           Dead Time Address         Interface
200.1.2.2         1 Full/DR           38.456s 200.1.2.2       ge1.200
n1#
تست connectivity بین VRF ها
n1# ping vrf vrf-red 192.168.2.1
PING 192.168.2.1 (192.168.2.1): 56 data bytes
64 bytes from 192.168.2.1: icmp_seq=0 ttl=64 time=1.234 ms
64 bytes from 192.168.2.1: icmp_seq=1 ttl=64 time=0.987 ms

--- 192.168.2.1 ping statistics ---
2 packets transmitted, 2 packets received, 0% packet loss
n1#
ایزولهسازی VRF
از vrf-red نمیتوان به شبکههای vrf-blue ping زد و بالعکس، حتی اگر از یک interface فیزیکی استفاده کنند:
n1# ping vrf vrf-red 192.168.2.1
# موفق - چون 192.168.2.1 در vrf-red است

n1# ping vrf vrf-red 192.168.2.1
# ناموفق - اگر 192.168.2.1 در vrf-blue باشد
دستورات Show برای VRF
نمایش لیست VRF ها
برای نمایش تمام VRF های تعریف شده:
n1# show vrf
VRF Name             VRF ID       Interfaces
vrf-red                   1       ge0, ge1.100
vrf-blue                  2       ge2, ge1.200
n1#
نمایش اطلاعات کامل یک VRF
n1# show vrf vrf-red
VRF Name: vrf-red
  VRF ID: 1
  Table ID: 1
  Interfaces:
    ge0
    ge1.100
  Route Distinguisher: not set
  Export VPN Targets: not set
  Import VPN Targets: not set
n1#
یا با استفاده از VRF ID:
n1# show vrf id 1
VRF Name: vrf-red
  VRF ID: 1
  ...
n1#
نمایش interface های یک VRF
n1# show interface vrf-name vrf-red
Interface      IP-Address      Status                Protocol
ge0            192.168.1.1/24  up                    up
ge1.100        200.1.2.1/24    up                    up
n1#
نمایش جدول مسیریابی VRF
با استفاده از FIB (Forwarding Information Base):
n1# show ip fib vrf vrf-red
Codes: K - kernel route, C - connected, S - static, R - RIP,
       O - OSPF, I - IS-IS, B - BGP, P - PIM,
       > - selected route, * - FIB route

VRF vrf-red:
C>* 192.168.1.0/24 is directly connected, ge0
O>* 192.168.2.0/24 [110/20] via 200.1.2.2, ge1.100, 00:05:32
C>* 200.1.2.0/24 is directly connected, ge1.100
n1#
نمایش مسیرهای OSPF در VRF
n1# show ip ospf vrf vrf-red route
============ OSPF network routing table ============
N    192.168.1.0/24          [10] area: 0.0.0.0
                             directly attached to ge0
N    192.168.2.0/24          [20] area: 0.0.0.0
                             via 200.1.2.2, ge1.100
N    200.1.2.0/24            [10] area: 0.0.0.0
                             directly attached to ge1.100

============ OSPF router routing table =============
============ OSPF external routing table ===========
n1#
نمایش OSPF neighbor های VRF
n1# show ip ospf vrf vrf-red neighbor

Neighbor ID     Pri State           Dead Time Address         Interface
200.1.2.2         1 Full/DR           35.123s 200.1.2.2       ge1.100
n1#
نمایش اطلاعات کامل تمام VRF ها
n1# show vrf detail
VRF Name: vrf-red
  VRF ID: 1
  Table ID: 1
  Interfaces: 2
    ge0
    ge1.100
  Address Families: ipv4 unicast
  Routes: 3 (2 connected, 1 ospf)

VRF Name: vrf-blue
  VRF ID: 2
  Table ID: 2
  Interfaces: 2
    ge2
    ge1.200
  Address Families: ipv4 unicast
  Routes: 3 (2 connected, 1 ospf)
n1#
جدول مرجع دستورات Show
توضیح |
دستور |
|---|---|
نمایش لیست تمام VRF ها |
|
نمایش اطلاعات یک VRF خاص |
|
نمایش VRF با شماره ID |
|
نمایش اطلاعات کامل تمام VRF ها |
|
نمایش interface های یک VRF |
|
نمایش جدول مسیریابی VRF |
|
نمایش مسیرهای OSPF در VRF |
|
نمایش OSPF neighbor های VRF |
|
نمایش interface های OSPF در VRF |
|
نمایش BGP routes در VRF |
|
بررسی عملکرد VRF
پس از پیکربندی VRF و تشکیل جدول مسیریابی، باید موارد زیر را بررسی کنید:
1. جداسازی جداول مسیریابی
در یک شبکه با 2 VRF (vrf-red و vrf-blue)، باید 3 جدول مسیریابی مجزا وجود داشته باشد:
جدول default routing table
جدول vrf-red routing table
جدول vrf-blue routing table
بررسی:
n1# show ip route
# نمایش default routing table

n1# show ip fib vrf vrf-red
# نمایش vrf-red routing table

n1# show ip fib vrf vrf-blue
# نمایش vrf-blue routing table
2. ایزولهسازی ترافیک
نودهای داخل هر VRF باید از سایر VRF ها جدا باشند.
مثال عملی
فرض کنید:
Server1 (192.168.1.100) در vrf-red
Server2 (192.168.2.100) در vrf-blue
n7, n8 متصل به vrf-blue
نتیجه:
n7 و n8 میتوانند به Server2 وصل شوند ✅
n7 و n8 نمیتوانند به Server1 وصل شوند ❌
تست:
n7# ping vrf vrf-blue 192.168.2.100
PING 192.168.2.100 (192.168.2.100): 56 data bytes
64 bytes from 192.168.2.100: icmp_seq=0 ttl=64 time=1.234 ms
# موفق ✅

n7# ping vrf vrf-blue 192.168.1.100
# ناموفق - Server1 در vrf-red است ❌
3. استفاده از IP های یکسان
VRF به شما اجازه میدهد از IP های یکسان در VRF های مختلف استفاده کنید:
n1# show interface  vrf vrf-red brief
Interface       IP-Address      Status       Protocol
ge1             200.1.1.1/24    up           up

n1# show interface vrf vrf-blue brief
Interface       IP-Address      Status       Protocol
ge2             200.1.1.1/24    up           up
# همان IP در vrf دیگر ✅
نکته مهم
این IP های یکسان در دو VRF مختلف، با هم تداخلی ندارند و کاملاً از هم جدا هستند.
Debugging و عیبیابی VRF
فعالسازی VRF Debug Logs
برای بررسی event های VRF و عیبیابی:
n1# debug vrf event
VRF Event debugging is on
n1#
خروجی نمونه:
n1# debug vrf event
n1#
*Oct 10 12:34:56.789: VRF vrf-red: created, table id 1
*Oct 10 12:35:01.234: VRF vrf-red: interface ge0 added
*Oct 10 12:35:05.678: VRF vrf-red: interface ge1.100 added
n1#
غیرفعال کردن Debug
n1# no debug vrf event
VRF Event debugging is off
n1#
یا غیرفعال کردن تمام debug ها:
n1# no debug all
All possible debugging has been turned off
n1#
بررسی مشکلات رایج
مشکل 1: Interface در VRF اما routing کار نمیکند
علت: interface به VRF assign شده اما در پروتکل routing اضافه نشده
راهحل:
n1(config)# router ospf vrf vrf-red
n1(config-router)# network 192.168.1.0/24 area 0
n1(config-router)# exit
مشکل 2: Ping کار نمیکند
علت: فراموش شدن مشخص کردن VRF در دستور ping
اشتباه:
n1# ping 192.168.2.1
# این از default routing table استفاده میکند ❌
صحیح:
n1# ping vrf vrf-red 192.168.2.1
# این از vrf-red routing table استفاده میکند ✅
مشکل 3: OSPF neighbor تشکیل نمیشود
بررسی:
n1# show ip ospf vrf vrf-red neighbor
# اگر خالی بود، neighbor تشکیل نشده

n1# show ip ospf vrf vrf-red interface ge1.100
# بررسی وضعیت OSPF روی interface
راهحل احتمالی:
بررسی area number در هر دو طرف
بررسی network statement
بررسی interface که up باشد
حذف VRF
برای حذف تنظیمات VRF، باید به ترتیب زیر عمل کنید:
مرحله 1: حذف routing protocol از VRF
قبل از حذف VRF، باید پروتکل routing را حذف کنید:
n1(config)# no router ospf vrf vrf-red
n1(config)#
مرحله 2: حذف VRF از interface ها
n1(config)# interface ge0
n1(config-if)# no ip vrf forwarding vrf-red
n1(config-if)# exit
n1(config)#
هشدار
با اجرای no ip vrf forwarding، IP address از interface حذف میشود! باید دوباره IP را تنظیم کنید:
n1(config-if)# no ip vrf forwarding vrf-red
n1(config-if)# ip address 192.168.1.1/24
n1(config-if)# exit
مرحله 3: حذف sub-interface ها (در صورت وجود)
n1(config)# no interface ge1.100
n1(config)# no interface ge1.200
n1(config)#
مرحله 4: حذف VRF
پس از حذف تمام interface ها و routing protocol ها، VRF را حذف کنید:
n1(config)# no vrf vrf-red
n1(config)# write
n1(config)# exit
n1#
بررسی حذف VRF
n1# show vrf
VRF Name             VRF ID       Interfaces
vrf-blue                  2       ge2, ge1.200
n1#
# vrf-red دیگر وجود ندارد
مثال کامل حذف VRF
n1(config)# no router ospf vrf vrf-red
n1(config)# interface ge0
n1(config-if)# no ip vrf forwarding vrf-red
n1(config-if)# ip address 192.168.1.1/24
n1(config-if)# exit
n1(config)# interface ge1.100
n1(config-if)# no ip vrf forwarding vrf-red
n1(config-if)# exit
n1(config)# no interface ge1.100
n1(config)# no vrf vrf-red
n1(config)# write
Building configuration...
[OK]
n1(config)# exit
n1#
بهترین شیوهها (Best Practices)
1. نامگذاری VRF
از نامهای معنادار استفاده کنید:
✅ vrf customer-A
✅ vrf management
✅ vrf internet
❌ vrf vrf1
❌ vrf test
2. مستندسازی
همیشه VRF های خود را مستند کنید:
n1(config)# vrf customer-A
n1(config-vrf)# exit
3. استفاده از VRF برای Management
VRF مجزا برای management ایجاد کنید:
n1(config)# vrf management
n1(config-vrf)# exit
n1(config)# interface ge0
n1(config-if)# ip vrf forwarding management
n1(config-if)# ip address 10.0.0.1/24
n1(config-if)# exit
4. تست قبل از Production
همیشه VRF را قبل از استفاده در production تست کنید:
n1# ping vrf vrf-red 192.168.1.1
n1# traceroute vrf vrf-red 192.168.2.1
n1# show ip fib vrf vrf-red
5. Backup پیکربندی
قبل از تغییرات VRF، حتماً backup بگیرید:
n1# copy system:startup-config backup:before-vrf-change
خلاصه دستورات VRF
ایجاد و پیکربندی
دستور |
توضیح |
|---|---|
|
ایجاد VRF |
|
اختصاص interface به VRF |
|
پیکربندی OSPF در VRF |
|
تنظیم VLAN برای sub-interface |
نمایش اطلاعات
دستور |
توضیح |
|---|---|
|
نمایش تمام VRF ها |
|
نمایش اطلاعات یک VRF |
|
نمایش جدول routing VRF |
|
نمایش interface های VRF |
عیبیابی
دستور |
توضیح |
|---|---|
|
فعالسازی VRF debug |
|
Ping از VRF خاص |
|
Traceroute از VRF خاص |
حذف
دستور |
توضیح |
|---|---|
|
حذف OSPF از VRF |
|
حذف VRF از interface |
|
حذف VRF |